Showing posts with label tack. Show all posts

Wednesday, January 11, 2012

Dreamflite's English Saddle Instruction Guide

See the original post here

Dreamflite Design is putting the finishing touches on her Stablemate Scale English Saddle Tutorial, preparing it for public release.

The guide includes...
  • 17 pages of information, instruction, and reference material.
  • 71 full-color pictures and illustrations
  • A list of suppliers and helpful links
  • Photos of REAL saddles for reference
  • Pattern for saddle parts, sized for the G3 Warmblood
  • Some tips and tricks to make the process easier
The guide will sell as a PDF for $10 a copy, but as a thank you to her blog readers, anyone who emails her and requests a copy between today and January 17th will get a copy for free! You'll have to click through to her blog to get her e-mail address, I'd rather give her direct traffic than share her e-mail addy myself, so click the link at the top of this post to get to her original blog post.

I'm really looking forward to snagging my own copy of this guide, because it'll be really helpful for me, having never made a saddle myself.

Sunday, January 8, 2012

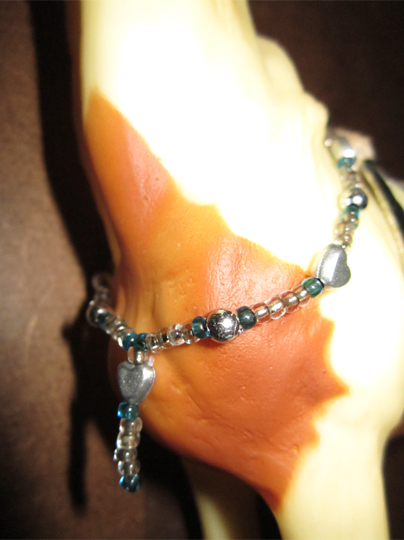
I Heart Blue and Silver Rhythm Beads

This lightweight set of plastic rhythm beads is made with love; the proof is in the design, with satin silver heart beads, big, glossy silver beads, and a splash of pale blue color to really make them pop.

Yesterday evening I finished up a quick tack project, a set of rhythm beads for Classic scale horses. They're simple, if a bit fiddly to make, but I had fun making them.

They're available on Model Horse Sales Pages for $10 or best offer, postage paid to anywhere.

Impressive Tack Sales Photo

I was browsing MH$P when I stumbled on this gem of a sales photo in the tack category.


The photo and tack are by JS Custom Tack. What really caught my eye is that not only does it show the saddle in excellent detail, it also shows the tack in situ in a miniature tack room. This is a fantastic presentation of a saddle for a sales photo. If I were not financially challenged, and were in the market for a model horse saddle, a composed shot like this might very well clinch the deal for me.

A large, good, clear photo, with the saddle either on a model, or on a saddle stand, will always be better than a pile of tack, it shows that the person is proud of their work, and happy to allow you to scrutinize it. The willingness to provide high detail pictures shows that there is nothing the tack maker wants to hide.

Setting up a tack room diorama to take that sales photo says so much more. Not only are they proud to show off their tack, they're also saying "look at my attention to detail!" Think about it, if they've gone to the trouble of constructing a flawless, in-scale tack room, how much trouble did they go to in capturing the tiny details while making that tack item? You know you're going to be getting a superior product.

This is fantastic Ms. Skybova! You've given me a lot to think about, and a new pet project: making a miniature tack room, and someday filling it with amazing pieces of miniature functional art!

Saturday, January 7, 2012

Tack tip!

Reading the Braymere Custom Saddlery blog comments today before I get back to work on my diorama and customs (especially Antar) yielded a great little tip for how to make keepers for miniature tack.

Here's the original post: Braymere Custom Saddlery: Tiffany's Show Hack Bridle

And here's the excerpt from the comments that really caught my eye:
Sian said...
Just WOW! And what did you use for the metal keepers? 
Braymere said...
Thanks, everyone!

The keepers are made from very thin brass sheet metal. I cut them out with tin snips and shaped them with pliers. They're fairly easy to make--the trick is getting them consistently the same size!
So! There you have it! A great little tack tip in Braymere's comments. I love reading her blog because she does share those great tips, and it's so fun looking at the beautiful tack she makes.

Friday, December 2, 2011

Playing with my new camera

I got my new camera yesterday, and had a play with it. Here's some of the shots I took with it while I was learning how to use it:

Riley
LRH Y B Rojas
LRH Rum Runner wearing a deluxe red and black nylon halter made by Long Road Home
Socks (the pink spot is a corneal graft)
LRH White Lightning wearing a nylon safety halter made by Long Road Home

That's not all the pictures I took while I was playing around, I deleted a ton more. My camera battery needs recharging before I can play some more.

Now I've got a decent camera, maybe I can focus on making some tack for sale. I've got plans for some nylon and leather halters, and possibly some rugs. They won't necessarily be rugs that match with halters, since I only have three colors of ribbon, one satin red, one satin black, and one grosgrain black, and one larger satin yellow, but maybe they'll catch someone's eye anyway :)

Saturday, October 1, 2011

Cats, glasses, and life

The last month and some change has been very hectic for me. My cat had an eye infection, which developed into a dismetocele (a crater in the cornea), which required surgery. The treatment for the infection, and then the aftercare for the surgery put my whole life on hold. He's finally out of his "cone of shame" and getting back to normal, and I have only four more days, including today, of intense medication schedules.

Despite being very busy with my cat, I have been getting a few things done here and there, including constructing a SM scale stall from craft sticks. I've got a lot left to do, and I doubt I'll finish it before the new year, but when it's finished, I'll be showing it off on here. I've also made a few SM scale cross-country jumps, which only need some finishing touches.

The next thing that came up was that I got superglue vapor on my old glasses. It stuck to a smudge on the lens, and that was the end of that pair of glasses. I need my glasses for detail work. My vision isn't bad enough I need glasses for everything, but I can't read, write, or work on tack, painting and other detail crafts without them. My prescription changed significantly in one eye as well, and I'm still getting used to my new glasses. The focal area seems much smaller, because I have smaller lenses than I did before. I have two pairs now, one for general work, and one very narrow lensed pair that are good for keeping my focus on writing (actually why I chose them).

With my birthday coming up toward the end of November, I've decided to put a hold on trying to get good sales pictures of my halters with my bad camera, since I'm going to be getting a slightly better camera for my birthday this year.

I'm going to try assemble a quick how-to guide on photoshowing with a bad digital camera, since I have the example pictures ready. I might be moving on to a new camera, but I'm sure there are a few people out there who might glean something useful from my experience.

I'm still prepping my batch of SMs. Does the prepping phase ever end? I'm so done with prepping, I want to get to the painting, but I think I'm going to hit problems with sealer now that we're in fall and heading toward winter. My sealer doesn't work well in low temperatures, it gets grainy.

I'll still be showing through fall and winter, so it won't be completely dead around here, and I'll still be able to make tack. I have a nice halter design that I'm planning to make a lot of. I stocked up my tack making kit last time I made a trip to Wal-mart, with cheap jewelry making supplies and some grosgrain ribbon. The current set of halters are red satin-backed black grosgrain with jump-ring hardware (including a new no-bend jump-ring buckle design that looks pretty neat), and look pretty spiffy. More on those at the end of November, when I can show them off properly.

Monday, August 29, 2011

Tack Tips

I'm new to tack-making. I admit it, I'm such a noob at it that the only thing I feel okay with the idea of selling is plain halters.

But, you've probably noticed I've been fiddling around with saddles despite that fact. I find crafty stuff easier to learn by doing, which means practice efforts that will make seasoned tackmakers cringe. But that's fine by me, and I'm still going to share my tackmaking on the blog, so that maybe some other complete noobs can follow in my footsteps and not feel like they failed miserably.

This week, over at Dreamflite, there was a blog post about buckle free tack that I think is well worth reading. Go check it out! I don't own any sticky wax, the only temporary stick stuff I have is PVA glue, but I'm going to try using Dreamflite's tips when I try making an artillery harness for LRH Nighthawke. I'd always intended her to be an artillery horse, from the moment I bought her. She'll be wearing a British Horse Artillery set one day.

Wednesday, August 17, 2011

Lots of small updates

I'm still prepping the Stablemates. I'd forgotten how long prepwork takes!

In between letting coats of primer dry, I've been trying to assemble my own Aussie saddle pattern in CL scale. I've been making the original shapes out of sheets of foam, so once I've got that finalized, I'll scan them in to show what I've got.

I've actually gotten to the point where I've made the saddle tree, and started making the seat itself. I did something a little different from a lot of model horse tackmakers, making the saddle tree out of sintra. Sintra is a closed cell PVC foam. It's quite resilient, and heat formable. It's flexible when it's thin, just flexible enough that used in tack making, it won't hurt it too much if you squish a saddle. I use sintra a lot in my costuming hobby, so I have tiny scraps sitting around a lot of the time. The cheap plastic for sale signs printed with black and orange that you find in stores are usually made out of sintra, which should give you an idea how cheap the material is.

I'm still working on the flaps, and I want to try something a little different in how my stirrups attach to make them removable and and easy to replace. I was thinking about somehow using hooks and eyes, but I haven't quite figured out how I'm going to make that work yet. I don't have any super-fine leather, I'm using what I have on hand, so it's going to look a little coarse, but it should be sufficient for photoshowing.

I've also got a quick no-pattern Portuguese/Spanish styled treeless saddle I'm making out of vinyl, leather, and foam, which is coming along nicely. I'll make a pattern for this too, since it's pretty quick and cheap to make, and would be good for a kid's tack collection.

I've also entered some of my horses into the races over at the Model Horse Fun Club.

Saturday, July 30, 2011

Guess What I'm Trying To Learn

It involves some difficult knot tying...

If this were full-size, I'd need about 20ft of rope...

Cowboys used to be paid a good sum of money to tie one of the knots in this.