Wednesday, January 11, 2012

Dreamflite's English Saddle Instruction Guide

See the original post here

Dreamflite Design is putting the finishing touches on her Stablemate Scale English Saddle Tutorial, preparing it for public release.

The guide includes...
  • 17 pages of information, instruction, and reference material.
  • 71 full-color pictures and illustrations
  • A list of suppliers and helpful links
  • Photos of REAL saddles for reference
  • Pattern for saddle parts, sized for the G3 Warmblood
  • Some tips and tricks to make the process easier
The guide will sell as a PDF for $10 a copy, but as a thank you to her blog readers, anyone who emails her and requests a copy between today and January 17th will get a copy for free! You'll have to click through to her blog to get her e-mail address, I'd rather give her direct traffic than share her e-mail addy myself, so click the link at the top of this post to get to her original blog post.

I'm really looking forward to snagging my own copy of this guide, because it'll be really helpful for me, having never made a saddle myself.

Monday, January 9, 2012

Things That Make You Go "Ouch!"

I decided, during a break in work, to do a bit of light reading about Norman (as in the people from Normandy circa 1066) tack. I thought it would be neat to make a set of Norman tack for a horse.

In reading, I found this passage in Festivals, Games & Amusements, Ancient & Modern by Horace Smith (Amazon link):
"During a siege," says this ancient writer, "it happened that two soldiers running in haste towards a tower situated at a little distance from them, were attacked with a number of arrows from the Welsh; which being shot with prodigious violence, some penetrated through the oak doors of a portal, although they were the breadth of four fingers in thickness."
Yes, that's about a hand of penetration through an oak door. From this, I think it's safe to say these bows were more than just a little deadly. According to the Mythbusters, four inches of penetration in a human can be considered potentially lethal, so four inches through an oak door means there's more than enough force to go clean through a human.

What followed was not particularly shocking, in light of the previous passage.
"It happened also in a battle at the time of William de Breusa (as he himself relates), that a Welshman having directed an arrow at a horse-soldier of his who was clad in armour, and had his leather coat under it, the arrow, besides piercing the man through the hip, struck also through the saddle, and mortally wounded the horse on which he sat."
Yikes! That's pretty hard to imagine going through. You've got an arrow in your well-armored hip, you're pinned to your saddle, and your horse just went down under you. You'd think that's a worst case scenario, right? Wrong!
"Another Welsh soldier having shot an arrow at one of his horsemen, who was covered with strong armour in the same manner as the before-mentioned person, the shaft penetrated through his hip, and fixed in the saddle; but what is most remarkable is, that as the horseman drew his bridle aside in order to turn round, he recieved another arrow in his hip on the opposite side, which passing through it, he was firmly fixed to the saddle on both sides."
Where to begin? Ouch that had to hurt? Or man that guy has rotten luck?

As a historian, and a former joust squire, I find this stuff fascinating, so I thought I'd share it too. It's topical, isn't it? It's horsey, kind of, and it was found while researching for model horse tack.

Sunday, January 8, 2012

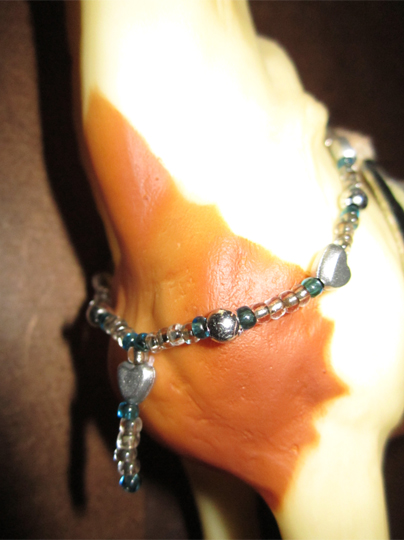
I Heart Blue and Silver Rhythm Beads

This lightweight set of plastic rhythm beads is made with love; the proof is in the design, with satin silver heart beads, big, glossy silver beads, and a splash of pale blue color to really make them pop.

Yesterday evening I finished up a quick tack project, a set of rhythm beads for Classic scale horses. They're simple, if a bit fiddly to make, but I had fun making them.

They're available on Model Horse Sales Pages for $10 or best offer, postage paid to anywhere.

Impressive Tack Sales Photo

I was browsing MH$P when I stumbled on this gem of a sales photo in the tack category.


The photo and tack are by JS Custom Tack. What really caught my eye is that not only does it show the saddle in excellent detail, it also shows the tack in situ in a miniature tack room. This is a fantastic presentation of a saddle for a sales photo. If I were not financially challenged, and were in the market for a model horse saddle, a composed shot like this might very well clinch the deal for me.

A large, good, clear photo, with the saddle either on a model, or on a saddle stand, will always be better than a pile of tack, it shows that the person is proud of their work, and happy to allow you to scrutinize it. The willingness to provide high detail pictures shows that there is nothing the tack maker wants to hide.

Setting up a tack room diorama to take that sales photo says so much more. Not only are they proud to show off their tack, they're also saying "look at my attention to detail!" Think about it, if they've gone to the trouble of constructing a flawless, in-scale tack room, how much trouble did they go to in capturing the tiny details while making that tack item? You know you're going to be getting a superior product.

This is fantastic Ms. Skybova! You've given me a lot to think about, and a new pet project: making a miniature tack room, and someday filling it with amazing pieces of miniature functional art!

Saturday, January 7, 2012

Tack tip!

Reading the Braymere Custom Saddlery blog comments today before I get back to work on my diorama and customs (especially Antar) yielded a great little tip for how to make keepers for miniature tack.

Here's the original post: Braymere Custom Saddlery: Tiffany's Show Hack Bridle

And here's the excerpt from the comments that really caught my eye:
Sian said...
Just WOW! And what did you use for the metal keepers? 
Braymere said...
Thanks, everyone!

The keepers are made from very thin brass sheet metal. I cut them out with tin snips and shaped them with pliers. They're fairly easy to make--the trick is getting them consistently the same size!
So! There you have it! A great little tack tip in Braymere's comments. I love reading her blog because she does share those great tips, and it's so fun looking at the beautiful tack she makes.